Layers
PhotoSuite features complete layer support for robust, desktop-grade editing capabilities. Each new drawing, shape, and image added to your project can be manipulated separately from your project's other elements.
Whenever you add a new element to your project - like drawing a shape or adding text - PhotoSuite will automatically create it in its own layer.
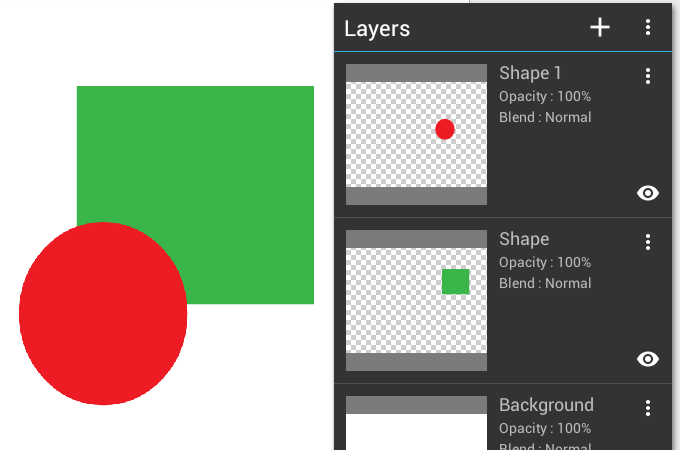
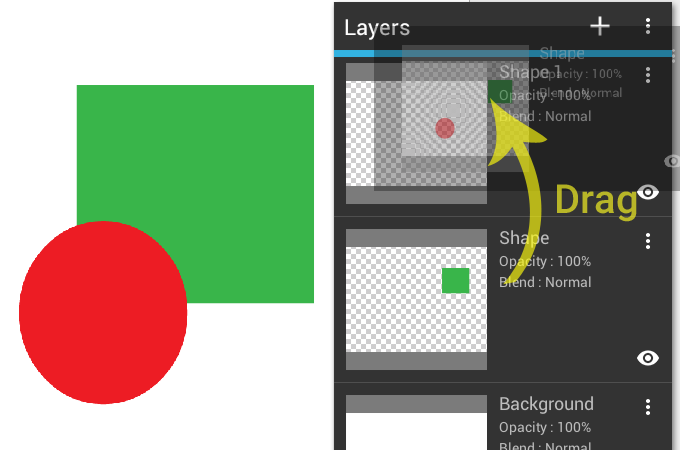
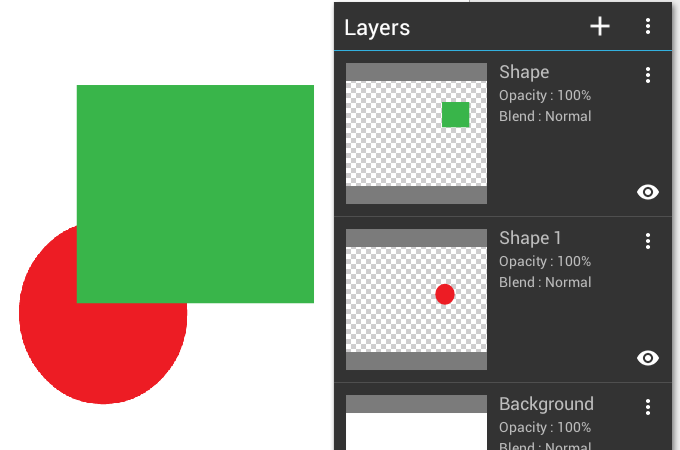
Tapping the  Layers icon will reveal all of your current project's layers. Layers are ordered by visibility, with the topmost layer being the most visible, the next layer down showing up under the first, and so on. You can choose which layers will show up above others by dragging them above/below others in the layers list.
The  New Layer icon lets you add new layers to your project in one of three ways:
- New empty layer inserts a blank layer that you can add content to.
- Insert from gallery lets you drop in images and photos from your Android gallery.
- Capture image using your devices' camera and add it as a new layer.
The  Contextual menu for the layer tool gives you multiple ways to manage your layers:
- Create Group allows you to manage your layers by putting them into groups.
- Merge visible layers into one inclusive layer. Does not apply to hidden layers.
- Flatten image merges all layers into one inclusive layer. Hidden layers will be discarded.
Multiple selection toggles whether tapping on layers will select/deselect each one individually, or if only one layer can be selected at a time. When enabled, the Layers bar will display how many layers you've selected at a time, next to a  Trash bin icon for quick layer deletion. You will also get a host of new Contextual menu options:
- Group layers into a new layer group.
- Show all currently selected hidden layers.
- Hide all currently selected layers.
- Select all layers for easier manipulation. Also selects hidden layers.
- Select inverse will select any layer currently not selected. Includes hidden layers.
- Deselect all layers, including hidden layers.
Exiting from Multiple selection mode can be done by pressing the  Back arrow in the Layers bar.
Each layer has its own  Visibility icon. Tapping on this icon toggles whether it is Visible or
  Hidden.
Any layer masks will also show up as small thumbnails in the corresponding layer's window. On tablets, you also have the option to add layer names, which will appear next to the layer thumbnail alongside an opacity indicator.
There is a Contextual menu available for each individual layer as well:
- Opacity displays a slider of how transparent the layer is. The slider all the way to the right is completely solid, while all the way to the left is completely transparent.
- Blend modes determines how the layer is blended into the elements below it (i.e. the base layers):
- Normal: Adjusts the opacity of the top layer, without mixing with the colors of the layers underneath.
- Lighten: Compares the colors information of each pixel base and applies the lighter color as a result. Darker colors are replaced, while lighter colors are left untouched.
- Darken: Compares the colors information of each pixel base and applies the darker color as a result. Lighter colors are replaced, while darker colors are left untouched.
- Screen: Dark areas in the base color will become significantly lighter, while bright areas will become only slightly lighter.
- Delete a layer from your project.
- Rename a layer for easier identification.
- Duplicate a layer to create its exact copy.
- Merge down will create combine the layer with the layer directly below it.
- Fill will overlay the layer with a color you specify.
- Create mask/Delete mask will either create a mask of the layer's dimensions, or delete any current layer mask.
Layer Groups let you easily manage the layers of the same type, or those that compose a particular element of your project. Groups can be created by tapping Create Group from the Contextual menu of the Layers interface, or by tapping Group layers when multiple layers are selected.
To add one or more layers to a group, select and drag it/them into the created group.
Groups are identified by the  Group icon in the Layers dropdown, alongside the name that can be specified upon creation. The Contextual menu next to each group lets you:
- Rename the group for easier identification.
- Delete the group. You are prompted whether to keep or discard its contained layers.
- Ungroup layers into the parent directory and remove the group.
- Hide the group.
Selecting a group will provide new Contextual menu options for manipulating the group and its layers:
- Rename the group for easier identification.
- Merge group layers into one inclusive layer. Does not apply to hidden layers.
- Flatten group merges all group layers into one inclusive layer. Hidden layers will be discarded.
- Ungroup layers into the parent directory and remove the group.
- Create Group allows you to create nested groups, or groups within groups.
Multiple selection toggles whether tapping on layers in the group will select/deselect each one individually, or if only one layer can be selected at a time. When enabled, the Layers bar will display how many layers you've selected at a time, next to a Trash bin icon for quick layer deletion. You will also get a host of new Contextual menu options:
- Group layers into a new layer group to created nested groups.
- Show all currently selected hidden layers.
- Hide all currently selected layers.
- Select all layers for easier manipulation. Also selects hidden layers.
- Select inverse will select any layer currently not selected. Includes hidden layers.
- Deselect all layers, including hidden layers.