Selections let you easily make changes to parts of layers (individually or in groups) to enhance your PhotoSuite projects. The ![]() Select tool lets you do this in a wide range of methods.
Select tool lets you do this in a wide range of methods.
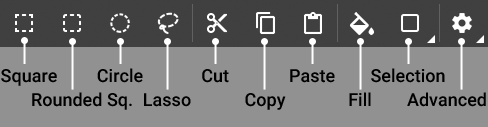
Like with the Shape tool, the currently active select tool will show up as an icon in the top left of the Select interface. By default, the ![]() Square method is selected, but you can also choose the
Square method is selected, but you can also choose the ![]() Rounded square,
Rounded square, ![]() Circle, or
Circle, or ![]() Lasso. The latter will allow you to create freeform selections from scratch.
Lasso. The latter will allow you to create freeform selections from scratch.
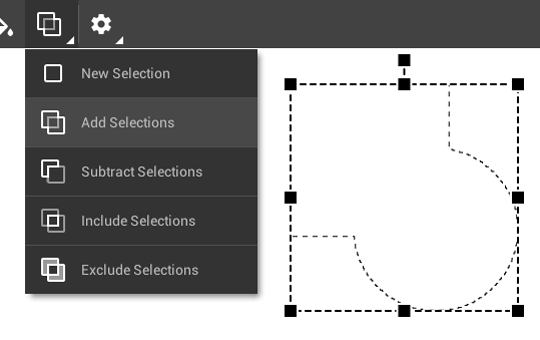
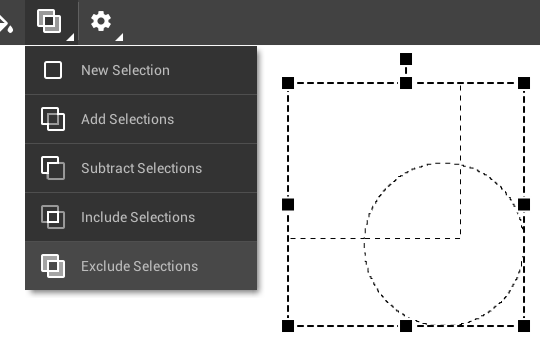
Selections can be created and combined in a variety of ways:


|
|
New selection creates it as a separate layer. |
|
|
Add selections merges selections created one after the other into a single layer. |
|
|
Subtract selections erases those parts of selections which overlap. |
|
|
Include selections retains only the parts of selections which overlap. |
|
|
Exclude selections erases only parts of selections which overlap, while retaining the new selection. |
Manipulating selections is done by dragging the anchors which appear whenever a created selection is selected. Resize selections in any direction through the corresponding anchors on the sides or corners, or rotate selections through the protruding rotate anchor.
The ![]() Additional settings icon provides more options when selecting. Uncheck the Lock aspect ratio checkbox to stretch and compress a selection while you're resizing. The Free transform checkbox gives you even more freedom to manipulate a selections' anchor points in relation to one another.
Additional settings icon provides more options when selecting. Uncheck the Lock aspect ratio checkbox to stretch and compress a selection while you're resizing. The Free transform checkbox gives you even more freedom to manipulate a selections' anchor points in relation to one another.
Once you've finalized your selection, you can use the quick shortcuts to ![]() Cut,
Cut, ![]() Copy, and
Copy, and ![]() Paste to/from the selection.
Paste to/from the selection.
There is also a ![]() Fill icon which can color your selection with a specified Hue, Saturation, and Opacity.
Fill icon which can color your selection with a specified Hue, Saturation, and Opacity.